Getting back into pottery. Term 1 makes – 2022

Standard
Getting back into pottery. Term 1 makes – 2022

I did pottery as a hobby for a while around 20 years ago, and I thought it was high time I got back into it. No doubt inspired by the fabulous Pottery Throw Down on Channel 4.

At the time, I mostly used the wheel, and had little interest in hand building or glazing. In the intervening years, I’ve sporadically been going to pottery painting cafes, and developed my interest in decorating pots.

The class I’ve joined at The Clay Studio in Uxbridge focuses a lot on hand building, and I’m loving learning how to make slab built and coiled pots.

The first term focussed on teaching texture, and we played around with slip, impasto, sgraffito and adding texture such as coffee grounds.

So here are a few of my creations from term one….

I recently set up my own business, and this is a pen pot for my home office with the bird from my new logo! Made using a template and the impasto technique. I used both bits of the template (one on each side) – the bird that I cut out (and put the slip over the bird before peeling it off, and the other way round where I filled in the gap where I had cut out the bird.

A couple of small plates that I used to practice slip trailing. I didn’t enjoy it as the containers used to apply the slip are a bit unpredictable!

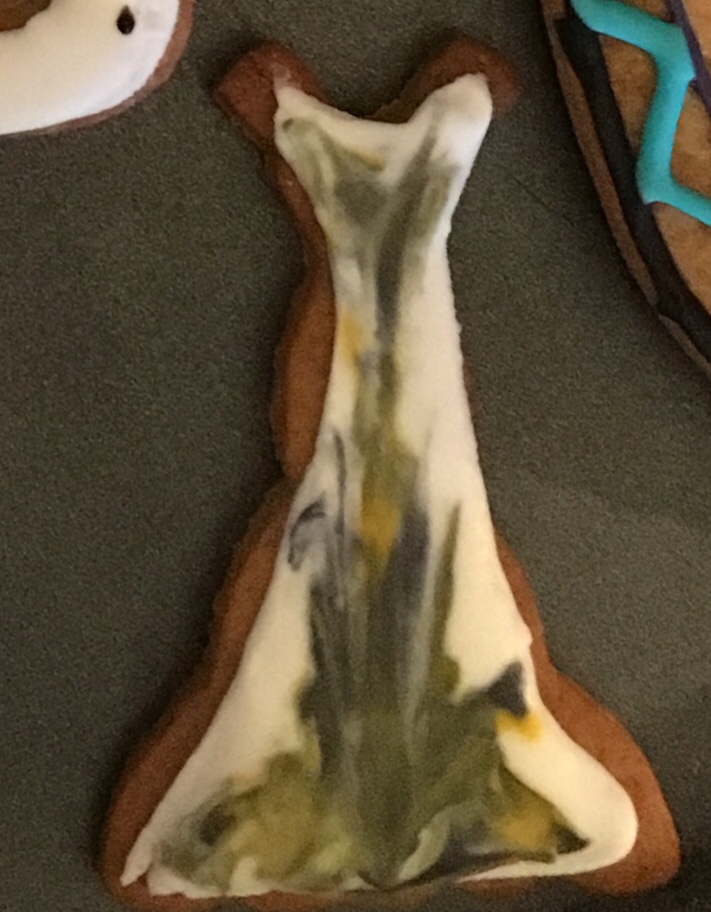
I love this one! It’s the impasto technique again, using a template I cut out of paper. Took ages to cut out the emplane, but I love the result.

This was my Mum’s Christmas present. A coiled vase decorated with speckled turquoise glaze with a band of iron oxide. I left texture on the outside of the pot so that the glaze would attach in different ways to the texture. Pretty pleased with my first ever coiled pot!

A small pot textured with cat litter and coffee grounds! Decorated with speckled turquoise glaze.

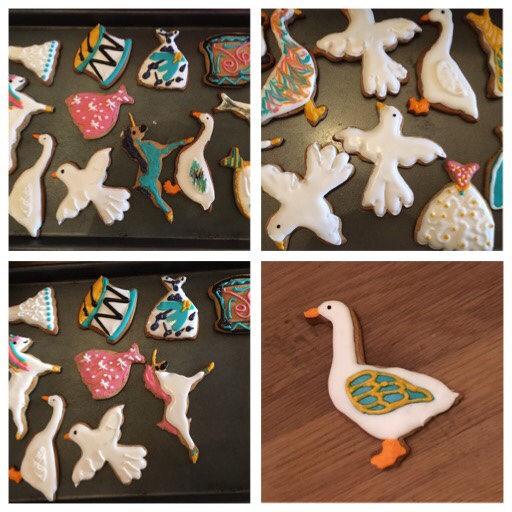
Photo taken in my my new light box that I made from a large cardboard box, some white crepe paper and a piece of white card. Really happy with the clean background it gives.

A Christmas present for my Sister-in-Law. Two mugs, a tea strainer and a tea canister which has a spoon holder on the side. Glazed with Spruce glaze. I wish I had taken better photos but I was in a rush to wrap them before Christmas!!

These are my first attempt at sgraffito. They are in for bisque firing this week and then I will glaze with a clear glaze. The slip is black, so hopefully the lines will really pop once the pieces are fired and the clay becomes white. Look out for updates with photos of the finished pieces.

We have just started term two, and I’ve begun making a bread baking pot and have plans for candlesticks, a tulip vase, an oil pourer and some different styles of mugs. Can’t wait!

Alocasia Zebrina Root Rot

Standard
Alocasia Zebrina Root Rot

I bought a lovely alocasia zebrina a while ago, and managed to very quickly almost kill it with a brilliant combination of cold, neglect then warmth and kindness (too much water).

I realised that the roots had rotted when I pulled it out of its pot and there were just a very few roots hanging on for dear life.

My good friend Google advised trying to rescue it in water (which seems entirely counter-intuitive given that it was water that was killing it), but I thought I had nothing to lose, so I picked out the two least dead looking shoots and put them in a jar of water each. The photos below show how yellow the leaves were, and how few roots there were.

I put them on my nursery windowsill which is north facing, so light, but no direct sun, and kept my fingers crossed. This was 17th May.

And lo and behold, within a few weeks, new roots appeared. The photos below were taken on the 28th May.

And by the 27th June, this new shoot had appeared on one of the plants.

I let it grow for a while, and then cut off the original shoot which was looking increasingly sick and dry, and the leaf more and more yellow.

The second plant followed pretty soon after, and now at the very end of August I feel they are ready for putting back into soil. They both have a healthy new leaf on the new shoot and a second shoot growing. They also both have a big new root system.

I’ve potted them into a multi purpose compost and they are currently in a south facing windowsill. It’s getting towards the end of the summer, so I’m not too worried about them getting too much light.

I’m really thrilled that they are looking on the mend. And I promise this time to try and keep a control on my desire to water them!

Jungle Biscuits

Standard
Jungle Biscuits

Another quick post with lots of photos. This time to show the jungle biscuits I made for my nephew’s 1st birthday.

Not sure you find all these animals in the jungle, but who cares?!

The cutters are Ann Clarke zoo ones from Amazon, and I used a heart one like this for the leaves and a unicorn one like the standing one from this set for the zebra (with the horn cut off!).

I used my usual biscuit (from The Biscuiteers book – see here) and icing recipes. These were my designs.

And the finished articles

The elephant and hippo were simple. Just a grey outline, grey flooding and then a second outline once the flooding was dry.

The monkey was also pretty simple, I did a dark brown outline and then an outline of the face and belly in beige.

Then flooded it in the appropriate colour and piped on the face in black when the flooding was dry.

Leaf also simple – outline on the heart biscuit, flood and then pipe the pattern when flooding dry.

The giraffe I outlined in beige, put on some blobs of brown in flooding icing, white flooding on the legs, brown for the tail, nose and ears, and then piped round the blobs with beige flooding. I like the informality of the shapes. If you wanted more precision I would recommend flooding completely in beige and piping on the brown pattern once the flooding is dry.

The last one I did was the zebra. I experimented with adding the black stripes at the point of flooding, and it was a disaster. So I piped the black stripes on one of them once the white flooding was dry. And I’m completely in love with it. Both with and without a black outline.

For the black icing I tried a new experiment. I added this Van Houten black cocoa to the icing.

It made a lovely dark grey, which I added some black food colouring to. And it made a fantastic black. It has a kind of Oreo taste, which I love, and used a lot less food colouring than normal, which is a good thing.

For the brown icing I added regular cocoa and brown food colouring.

Icing colours were Wilton Gel Pastes from Amazon.  I have a box of different colours, but you can buy them individually too.

If you don’t want to make your own icing, I recommend Meriwhite Royal Icing Mix – you can find it here.

Here they are at the party, plus some of the amazing other jungle themed things my sister made!

Related posts:

40th and 50th Birthday Biscuits

Pride Rainbow Biscuits

Iced Biscuits (Cookies)

Tiny Gingerbread Houses

Note that I am an Amazon Associate and may receive a small commission if you buy after following the links on this page.

40th and 50th Birthday Biscuits

Standard
40th and 50th Birthday Biscuits

Quick post this one! Just thought I would share the biscuits I made for our camping weekend to celebrate my brother’s 50th and my sister’s 40th birthdays.

Biscuit recipe was from The Biscuiteers book (here on Amazon) and icing was Meriwhite (here on Amazon)

I like to draw the biscuit designs so I can work out the best way to ice them/ what colours I need etc.

I trace round the cutter, and then draw in the designs.

For all of these biscuits I did an initial outline in the same colour as the flooding icing, then flooded them, dried them in the oven (super low heat – it’s much faster than letting them air dry), and then went over the outlines again in black. It really makes the designs pop.

To make the black (and brown) I added cocoa to the outline icing, then black (brown) food colouring. Means you can get away with less food colouring – and it darkens as it dries, so don’t worry if it’s not the blackest black when you pipe it.

Cutters are available from Amazon here.

My 9 year old daughter helped me ice these. She’ll be on junior bake off before I know it!

The birthday boy and girl enjoying their biscuits!

Related posts:

Pride Rainbow 🍪

Iced Biscuits (Cookies)

Note that I am an Amazon affiliate and may receive a small commission if you buy using the links on this site.

40th Birthday Cake

Standard
40th Birthday Cake

Yesterday it was my baby sister’s 40th birthday, and apart from making me feel very old, it was of course and excuse to try out my new cake tin, and some of the pretty cake ideas I’ve been seeing on Pinterest.

My new cake tin is ace! It’s a Countless Celebrations cake pan set by Wilton, which I got from Hobbycraft. You can use it to make any letter or number, and I guess a range of shapes, so I figure I will get a lot of use out of it. It’s a deep rectangle, and then has lots of small bits that you put into the tin to shape the letters/numbers. The bottom of the tin is dimpled to keep the bits in place.

I thought I would do one cake in chocolate and one in vanilla to please all tastes. I used the same victoria sponge recipe for both, just substituting cocoa powder for some of the flour. I like the egg weighing method, and I had to guess how much I would need for the tin (one criticism I have of the cake tin is that it doesn’t give any advice about amount of mixture for the different layouts). I went for 7 eggs per cake, and to be fair, I could have got away with 6. This is how it worked out:

7 eggs

400g caster sugar

400g unsalted butter

2 tsp vanilla bean paste

400g self raising flour (replace 50g of flour with cocoa for the chocolate version)

Enough milk to make a slightly looser batter

You know the score… cream the butter and sugar till pale and fluffy, gradually add the eggs and vanilla. Sift in the flour (and cocoa) and mix till just combined. I use my KitchenAid mixer for all steps, but some prefer to fold in the flour.

With the cake tin you make the letter/number backwards and then flip it over so you have a flat surface.

You have to be quite careful with them when releasing them from the pan, or they break! I will definitely invest in some of that spray on non stick stuff for next time I use them.

I cut mine into two layers and added jam (raspberry in one and homemade rhubarb in the other – which goes amazingly with chantilly cream – a kind of rhubarb and custard vibe).

I put a row of raspberries in the middle and piped blobs of cream round the edge (to make it look pretty). Then out the top layer on. The cream was whipped with a little icing sugar and vanilla bean paste. So yummy!

I found that making them into layers and filling/reconstructing them made them quite fragile. Hence the cracks in the photos below!

For the topping I piped cream blobs on the top and then topped it with a range of delicious goodies.

I used my meringue recipe to make meringue kisses (see here), and painted stripes inside the piping bag with food colouring gel. The gold below was paint not gel, and it didn’t work out so well. But the red worked great! I baked them slowly in a low oven.

I cheated with the rest by buying some chocolates, macarons and cutting some edible flowers from the garden (roses and pelargoniums) – make sure you use edible flowers – you can find a list here.

Fortunately I took these pictures before transporting the cakes to my sister’s. Because they were very delicate, and slipped around – half of the top layer of the 4 fell off in my hallway!! So I would only recommend making these and piling them so high of you are eating the cake in the same place that you make it!

Pride Rainbow Biscuits

Standard
Pride Rainbow Biscuits

London Pride is at the beginning of July, and we chose to celebrate it at work this year with a bake sale. With proceeds going to London Friend, the UK’s oldest Lesbian, Gay, Bisexual and Trans charity. I’m the head of the D&I practice at work, so it was a perfect excuse to combine my passion for inclusion and my love of baking.

I had seen some great rainbow cookies on Pinterest, and was inspired to make something bright and colourful.

I used my go-to biscuiteers vanilla biscuit recipe (as seen in this blog post, or here on their site) and decided to use the biscuiteers powdered egg white icing recipe (see here), rather than the one my friend gave me and I have used in previous posts. This is largely because I went for a lesson at biscuiteers, and they used this icing, and it was great! It uses less of the egg white powder than the other recipe, so it’s cheaper too! I use meri white powder, which I got from The Vanilla Valley – it was the best priced I could find).

To make things simple for myself, I decided just to do heart shapes. I always find I need to bake the biscuits slightly less time than the biscuiteers recipe.

I made up flooding icing in 6 colours of the rainbow (yes I know there are 7, but who really knows the difference between indigo and violet!), plus lining icing in red. I’m getting much better at gauging the consistency of the icing. For lining icing I just the mix as it comes in the recipe, and for flooding, dilute with water to shampoo consistency).

I always use gel colours, and I love the Wilton range. I bought a big box of different colours from Amazon a while back, and they are great. Though I reckon you could just have the primary colours, and black, and you could mix your own different colours!

For flooding I’ve started using plastic bottles rather than icing bags. Less messy, easy to control and better for the environment as you just wash them. I have them from a few different places. The ones in this kit from Amazon are good because they are easy to squeeze. Biscuiteers also sell some Goode ones – I picked up a few after my lesson, though they don’t seem to sell them on the website. Except on this kit. I use a Wilton size 1 or 2 plain tip. I don’t bother with a tip for outlining, I just cut a small hole in the bag, and make it bigger if I need to.

A top tip if you have the same colour outlining and flooding colours is to make the outline one first, use it, then dilute what is left to make the flooding icing. I did this with the red icing. I also made a bigger batch of yellow, then added blue to a third to make the green and red to a third to make orange.

Icing them was easy, but actually much more time consuming than I estimated. It turned into a pretty late night! I outlined them all in red first, then piped stripes of each colour onto the biscuits.

I started with thicker stripes (two passes with each colour), and then experimented with thinner stripes, and different patterns. I ran a cocktail stick through some to make them a little tye-dye looking.

I then baked them again for a little while on the lowest oven setting (mine only goes to 80 degrees) to set them. I find this much better than just leaving them to dry. It also means you quickly can pipe over the top with additional designs, without waiting for them to dry for hours. Which I didn’t with these. but did with the biscuits I will write about in my next post.

I’m pretty pleased with how they turned out, and they sold straight away at the bake sale!!

Related posts: 40th and 50th Birthday Biscuits

Tiny Gingerbread Houses

Iced Biscuits (Cookies)

Fox Cake

Standard

It was my neice’s 11th birthday recently and as we were going away with them for half term, I took along a bunch of baking stuff so I could make her a special cake.

Naturally I turned to Pinterest for inspiration, and I kept coming across cute fox cakes that I thought she would love. I’ve also wanted to make a striped zebra cake for ages, so I thought I would combine the two.

I wanted a tall layer cake and this recipe is enough for three shallow 8 inch cake tins, which I cut in half so we had six layers. If you want to get the zebra stripes to work in the best way, it’s probably better to bake one deep cake so the stripes stay in line.

For the white stripes:

175g butter
175g caster sugar

3 medium eggs
225g self-raising flour
1 tsp baking powder

Milk

For the brown stripes:

175g butter
175g caster sugar

3 medium eggs
200g self-raising flour
1 tsp baking powder

25g cocoa

Milk

I made them at the same time in two separate bowls.

Cream the butter and sugar then add the eggs. Fold in the sifted flour, baking powder (and cocoa for the dark stripes). Add enough milk to make a soft, loose mix. You don’t want it too stiff.

I actually mushed down 100g of raspberries and added them to the white stripe mix instead of some of the milk. Made it nice and moist.

Now for the fun bit. Grease and line the bottom of the cake tins.

Add a blob of dark mix in the centre of each tin, allow it to spread a little. Then add a blob of white directly in the centre of the dark one, allow to spread a little, then add dark. Keep on going until the mix has spread to the edge of the tin and all of the mix is used up. This is a good video here that shows how it works. Her mix is very runny, but it doesn’t have to be quite that runny. Mine was reasonably thick and I just encouraged it to go to the edges by tipping the tins.

Bake for around 20 mins at 180.

Once cold I cut all of my cakes in half to make six tiers and sandwiched them together with raspberry jam, chocolate buttercream, and on the middle layer I put fresh raspberries too.

The chocolate butter cream was 1 pack of unsalted butter (250g) a couple of tablespoons of cocoa, a couple of tablespoons of milk and enough icing sugar to make it the consistency and sweetness I like – I didn’t measure!

I then iced the outside with chocolate ganache, which was 400g of dark chocolate and 200ml of double cream. I chopped the chocolate and poured over the cream which I had warmed in the microwave. I managed to split it (eek), but discovered if you warm some milk and beat it in, then it magically goes back to the way it should be! Once the ganache was on I put it in the fridge overnight.

I used bought fondant icing (Mary Berry would be horrified). All Renshaws from Hobbycraft One small pack (250g size) of orange, 1/4 small pack of brown and half a large pack (500g size) of white kneaded together. This was the perfect amount to cover the cake, make the ears and tail. If you like your icing thick then use more as I rolled it reasonably thin.

The ears are triangles with the edges feathered (just cut out little triangles) and stacked them with a bit of black at the top and white inners. I just curled them slightly on my hand, and placed them on top of the cake. I used an egg box behind them to support them until they dried!

The tail is a roll of the main cake colour fondant, with black then white pushed together at the end. I make it look like fur with the back of a knife. This also helped blend the three colours together.

The face is white cut into a shape like the top of a heart and attached to the main cake with a little water on the back.

The nose is a blob of black, and the eyes are thin sausages of black stuck in an arch and then two tiny bits for eyelashes.

As you can see from this slice. The zebra stripes inside didn’t work so well – it looks more like a normal marble cake. It would have been much better as one or two larger cakes sliced and then put back together in the same pattern. Mine got a bit mixed up because it was so many cakes and layers.

All in all though, a successful cake, which tasted yummy and looked cute!

Spiced All Bran Cake

Standard
Spiced All Bran Cake

I don’t remember my grandma (on my Mum’s side) being much of a baker, but she did make a delicious cake made from Kellogg’s All Bran cereal.

I have inherited her cook book, which is filled with her lovely handwriting.

But unfortunately it doesn’t have her All Bran cake recipe in it. I remember it has equal measures of things in it, and, in a completely modern way for a British woman born in the 1930’s, it used cups rather than weights! Perhaps it was an American recipe? She used to make it with a mug as her measuring cup.

Fortunately, there are several recipes online, including on the Kellogg’s website, which I’ve used as inspiration for my own version.

100g All Bran (to be honest, I used Morrison’s own brand!)

100g caster sugar

150g sultanas

300ml milk (if you’re vegan a nut milk would work well I think)

100g self raising flour

1tsp allspice

Mix together the milk, All Bran, sugar and sultanas and leave to soak for at least 1 hour. My Grandma used to leave it overnight.

Preheat the oven to 180 degrees centigrade

Mix in the flour and allspice, pour it into a loaf tin (I line mine with baking paper). Bake for around an hour.

Leave it to cool a while, slice and serve with lashings of butter. The Danish have a word ‘Tandsmør’, which means ‘tooth butter’, and it’s when you have butter so thick that your teeth leave marks in it. This cake definitely deserves Tandsmør. However, I love it best warm, fresh out of the oven. It is to die for!

Houseplant Heaven – Propagating Succulents

Standard
Houseplant Heaven – Propagating Succulents

Most of my houseplants have been ordered online, and I’ve been really impressed how they have survived their journeys to my house.

However, I have found that the succulents tend to lose a few leaves in transit, which of course I can’t resist trying to turn into new plants!

The baby donkeys tail in particular lost lots and lots of leaves, which is nothing to do with how it was posted, it’s just a delicate plant!

I’ve propagated plenty of plants from cuttings, but have never tried succulent leaf propagation, so I thought I would give it a go.

I put about an inch of cactus compost in a seed tray, misted it with water, and scattered the leaves over the damp compost.

This tray (from left to right) has baby donkeys tail leaves, string of bananas leaves and variegated string of pearls leaves.

I have put them on a sunny windowsill with a plastic lid to keep the heat and moisture in. These photos were taken on the 20th January.

I received the baby donkeys tail plant about a week ago, and I have had the leaves that came off in transit in a plastic bag since then. One of the leaves already has some roots on it, so I’m hoping the rest get roots quickly. If they do, I’m going to have a lot of plants to give away!

Here is an update, on the 8th February, so less than 3 weeks later – some of them have shrivelled and died, but the vast majority are looking fine, with little roots forming on some of them.

I’ve been spritzing them regularly so they don’t dry out, and it’s been quite sunny, so they get quite warm in the daytime.

And another update on the 22nd March (so two months after I put them on the compost)- some tiny plants forming! I think I’m going to separate out the ones with plants forming and put them in their own individual modules.

And again on the 13th April. I’ve taken the largest ones and given them a small plug cell each to stop their roots getting tangled with each other.

The string of pearls has done really well (on the left) – actually better than the parent plant, so I’m glad I have some back up.

Nothing has happened to the string of bananas, just some roots forming, so I’m leaving them in the main tray for now to see if anything eventually happens.

You can see below how big the root systems are on them.

Eventually the piece they grew from will wither and die as they are getting all their nutrients from their root system.

It’s quite remarkable that in just three months I have almost 40 viable new plants for free. My friends and family will be happy, and my daughters schools fete plant stall will do well! If I was minded to try and make some money, the costs stack up well. The parent plant cost £17.50, so even if I just sold the babies in a few months for a couple of pounds each, I would be quids in, for very minimal effort!

Update… these are the plants at the end of June. Time to put them into proper pots. I’m thinking a couple put together in a small pot will soon make a nice little plant.

The ones I left in the original tray because they were too small to pot on have also done well, and one of the string of bananas finally started generating new growth. They have been joined by some leaves from some other succulents that have rooted really well just by laying them on the soil and keeping it moist with a spray. I’ve now turned them over to encourage the roots to grow into the soil. Free plants really are the best.

Copper Leaf Drinks Trolley

Standard
Copper Leaf Drinks Trolley

I have been lusting after a copper drinks trolley like this one and this one. But as most of them are at least £150 they are a little expensive.

I’ve had a blue Ikea Raskog trolley for a few years that was holding sewing supplies, and I thought I could do something with that. I don’t think they sell this colour anymore, but they still have it in different colours.

I’ve also become a little obsessed with gilding with gold leaf – I think I’ve watched too much ‘Escape to the Chateau -DIY’! I prefer copper to gold, so I thought I would try that instead.

I bought a starter kit from Wright’s Of Lymm which had brushes, copper leaf, gold size (glue) and varnish all in a handy tin.

Applying the copper leaf is pretty easy, if a little fiddly. You paint on the size and let it go tacky (like post it notes feel). Then you press on the leaf and brush over it with the soft brush that comes in the kit. It really doesn’t matter if it rips or there are gaps because you can just press on another piece, or leave the gap if you like a rustic look. The size stays tacky for ages, so there is no rush.

Beware it’s a messy job – the bits of leaf that you brush off get everywhere!

At first, I did the outside and inside of the main bits of the trolley and left the other bits blue.

However, I decided I wanted it all copper, so I thought I would try painting the legs. I had some copper coloured acrylic paint by Pebeo which I thought I would try.

It needed a couple of thin coats, but I think it looks pretty effective. I like the fact it’s a slightly different shade to the trays. I decided to leave the mesh at the bottom of the trays blue. I may spray them copper at some point in the future, but for now I’m done. I haven’t varnished it, but if I notice the copper leaf stating to chip off I will.

If I was to do this again, I would spray paint the legs and the mesh bottoms of the trays with copper paint first. That would be easier and quicker, and give a lovely even finish. Then I would apply the copper leaf. But I already had the acrylic paint, so I went with that!

My sister suggested some copper fairy lights – because apparently it wasn’t bling enough! So I added these tiny battery powered ones from Amazon

And here is the finished result…

It fits perfectly between two of my cabinets, but because it has wheels it can be pulled out if I need easy access. The lights add a nice little touch if I’m having a dinner party, and overall I’m very happy with it.

Wardrobe to Larder Cupboard

Standard
Wardrobe to Larder Cupboard

I have long lusted over the beautiful larder cupboards you see in the pages of glossy magazines and on Pinterest.

They’re a bit expensive, and I had a wardrobe I bought second hand to be a toy cupboard for my daughter that wasn’t being used, so I thought I would have a go at converting it into a larder cupboard. I bought it for £100, and even though it was in a second hand shop it was brand now. I googled it, and it would have cost £1000 full price.

Here it is pre-make-over. I had already removed the hanging rail and added a couple of shelves, so I knew turning it into a larder was possible with a bit of graft.

Firstly I painted it and replaced the handles/door knobs. The paint was Rustoleum satin finish furniture paint in slate. They have a great range that you can get on Amazon here.  It doesn’t need primer or even to sand the furniture beforehand. I added a sample pot of Farrow and Ball Inchyra Blue (sample pots available on Amazon here) to give it a bit darker and give it more of a blue tone. I’ve never used the Rustoleum paint before, and I was very impressed. Goes on very smoothly and it just took two coats. I put masking tape on the top panel so I could keep it pine coloured, which makes it match some of my other furniture (you can see it just to the right in the picture below). I didn’t paint the inside as I like the wood bare.

The hardware is brushed steel and you can find similar here and here

I bought two wooden wine racks from ikea. They’re called Hutten- see here. You have to assemble them, but it’s pretty simple. They each hold 9 bottles, so plenty of wine!  There is a huge selection of different sizes on Amazon here – all depends on the size of your cupboard, and how much wine you want to store!

The shelves are from Wickes. It’s called General Purpose Timberboard and you can buy it in different lengths and widths. Unfortunately they don’t do a cutting service anymore, so I had to break out my trusty jigsaw to make them exactly the right width and length!

The existing shelves were too deep because I wanted to add spice racks to the backs of the doors, so I trimmed them and cut the new shelf to size.

Obviously you could paint them, but I love the bare wood interior look.

I used some small shelf supports from Homebase, because that’s what I had lying around. They are supposed to be for glass shelves, and weren’t strong enough, so I replaced them for these.

The final touch is a couple of spice racks that I bought from Silver Apple Wood. They are great because they do them in lots of different widths and number of shelves. These are the deep ones, which means they will take larger items than just spice jars. They are made to order, and they took a couple of weeks to arrive.

I made a mistake with these though – I ordered two the same width, not realising the doors are slightly different widths. I need to get a slightly narrower one.

They’re easy to fix to the door, and come with all the fixings you need. I had to switch to shorter screws as the one supplied were too long for the depth of the door.

They are expensive though, and there are lots of cheaper (mainly metal) ones of different sizes here on Amazon.

And here is the finished item. I’m super proud of how it looks, and can’t wait to fill it.

So how much did I save?

The spice racks were £50 each, and the wine racks £8 each. The hardware was £18.50 and the shelf £20. The paint was about £20. Total £157.50. If you include the cost of the two shelves I had previously fitted (£40) and the wardrobe (£100), it comes to just under £300. The ones I’ve seen are at least £700, so I’ve saved minimum £400.

Now I’m off to clear out my over-stocked kitchen cupboards and fill this one!

Update – completed cupboard with the second spice rack added – perfect for baking paraphernalia.

Note that I am an Amazon affiliate and may receive a small commission if you buy using the links on this site.

Houseplant Heaven – Bathroom Jungle

Standard
Houseplant Heaven – Bathroom Jungle

I recently re-decorated my bathroom, and am sure that adding lots of green is going to work beautifully with the black and white theme.

I’ve had an aloe there for a while now, and apart from a mealybug infestation, it’s doing ok.

Recently I added this variegated Philodendron, which I’ve already blogged about here.

I completely fell in love with this small zebra plant (Aphelandra squarrosa) at Knights Garden Centre. Apparently they are a bit tricky to take care of – they like warmth and humidity. Not things we have a lot of in the British Winter! So I thought my bathroom would be the best place for it. I have a towel radiator in there which means the room gets reasonably warm, and it gets nice and humid when the shower is on. Fingers crossed it’s gets on ok. The pot is from Burgon and Ball.

The zebra plant has a couple of new friends since I started drafting this post. All from the lovely Suzanne at The Ginger Jungle. If you like unusual house plants, you have to check out her site. She has a very small business, and imports houseplants from all over the place. She has ones you won’t get anywhere else. I went to pick up my new plants from her today (she does mail order, but doesn’t live so far from me, so I went in person). Her house is a veritable jungle, it’s awesome!

The pink edged one at the back is Aglaonema Sparkling Sarah,

and the smaller one at the front is Hoya carnosa variegated ‘tricolor’, which has some pink leaves. I wanted some pink in the bathroom as I have a pale pink shower curtain, and I like things to match (but not too much). The pot is a gorgeous Wedgewood one that I bought in the RHS Wisley gift shop sale last year.

Hanging out above this gorgeous trio is a Fishbone cactus (Epiphyllum anguliger) also from The Ginger Jungle. The pot is from Burgon & Ball

I just love it’s crazy shape. And together I think the four of them have a great mixture of shapes, textures and colours. I’m very happy. Now I just have to keep them alive!

Related Posts: Houseplant Heaven – The beginning of an obsession

Houseplant Heaven – The beginning of an obsession

Standard
Houseplant Heaven – The beginning of an obsession

It’s the beginning of 2019, and, as usual, I’m behind the trends! Apparently 2018 was the year of the houseplant, and I only caught the bug at the very end of the year. I think it was a combination of seeing a lovely lush garden in Morocco (and knowing that I could only grow most of the plants indoors), the sadness of not getting out into the garden/allotment in Winter, and too much Pinterest browsing that has started me down this track.

I bought the RHS Practical House Plant Book to help me. It has sections on designing with houseplants, and profiles of 175 plants. It also has a helpful explanation of different types of light in a room, which is very helpful. And of course there is Google for information and Pinterest for inspiration.

I have to confess a love of variegated houseplants. I really like the irregular way the white shows up on the leaves.

Look at this gorgeous sweetheart plant (Philodendron Scandens Brasil). I have put it in my bathroom which is north facing, but with a large window, and it seems happy so far. It is about 1metre tall, and pinned down over the moss stick. I’m hoping that it’s going to get really long, and I can unpin it and train it over the end of the shower rail.

The best thing about is that you can make it climb or trail.

I also bought a Devil’s Ivy (Scindapsus pictus Trebie, also known as silver pothos) at the same time from my local garden centre Priory Farm Nursery. It looks similar to the philodendron, and was climbing on a 50cm moss stick. But being a contrary sort, I wanted it to trail. I undid it all (it was pinned to the stick with small metal pins), and it had one long and two shorter limbs (I’m sure there is a proper name for them!). I’m absolutely thrilled with how it looks cascading down the side of a wardrobe in my dining room. It is in the middle of a knocked through room, but gets quite a bit of light because I have huge 1930’s windows, and it’s near one which is south facing.

I’ve also taken cuttings of both of these. I plan to take cutting of all of my new plants, as an insurance policy! I’m putting them in water on a north facing windowsill. They look pretty, and hopefully will root soon.

Related posts: Houseplant Heaven – Bathroom Jungle

Inspiring Gardens – Majorelle Gardens – Marrakech

Standard
Inspiring Gardens – Majorelle Gardens – Marrakech

I recently went on a yoga holiday to a gorgeous hotel called Tigmi just outside Marrakech in Morocco.

I had heard about the Majorelle Gardens from a colleague, who said they were well worth a visit, and I managed to find a fellow garden loving yogi on the holiday, so we went together.

The gardens were built by French artist Jacques Majorelle, but it fell into disrepair when he died in the 1960’s. The garden is also known as the Yves St Laurent gardens as he and his partner Pierre Berge bought the house and gardens in 1981 to save it becoming a hotel. They had it restored and expanded the plant collection. When he died in 2008 his ashes were scattered there, and there is a memorial to him in the gardens (bizarrely it was the scruffiest part of the garden!).

It’s very popular, and was quite crowded, even at 10.30am, but it was an absolute delight to wander round a garden with someone else who loves plants as much as I do!

I’ve subsequently bought Paradise Gardens by Monty Don from Amazon (on kindle because it was only £3.99, and the photos look great on my iPad!), and discovered it’s also in there.

You can click through to the website or buy the book to get a sense of the main features in the garden, I’ve chosen to focus on smaller details that caught my eye. Partly because there were too many people to get good photos of the main structures, and partly because I like close ups of plants!

I loved the coloured pots dotted around the garden. I don’t think it would work in the UK, but it looks gorgeous in the Moroccan light.

This was a citrus area. In a formal pattern, with masses of different citrus trees in pots.

I fell in love with these gorgeous cut out pots. Not sure of their function, but they looked pretty.

Loved the planted tortoise!

And I thought this plant looked spectacular on the top of the wall.

Naturally there was a lot of water, both fountains and still ponds (with fish).

And despite being December, there was still colour and lovely flowers. I would love to know how they get their nasturtiums looking so neat!

Gorgeous arches, floors and doors!

And finally…I think this was my favourite part – you weren’t allowed to walk in this bit – I think it was the garden of the house. It had a lovely calm sense to it, and felt the most like a regular garden.

Related posts: Inspiring Gardens – Nymans Rose Garden, Inspiring Gardens – Perch Hill

Christmas Canapés

Standard
Christmas Canapés

For our early family Christmas dinner, I was responsible for starters and desserts. For starters I decided to do canapés, so people could eat as much/little as they liked, and still leave space for a huge turkey dinner.

Of course, stupidly I decided to make everything from scratch, rather than buying some from M&S!

Whilst each individual canapé was easy to make, it did end up being very time consuming. Most of them had aspects that could be made ahead, leaving just simple assembly on the day, so that helped. And I know that I’m biased, but they were delicious.

Our menu was:

  • Beetroot and goats cheese napoleons
  • Pears with blue cheese and prosciutto
  • Goats cheese and asparagus frittata
  • Scotch quails eggs
  • Caprese bites

In terms of make-ahead, I did the following:

Bake beetroot, Boil and peel quails eggs (fiddly!), Make frittata (but leave whole, and cut up on the day). I also made the scotch eggs the night before, but didn’t bake them until the next day.

All of the recipes are online, and I’ve just given my tips/thoughts below.

Beetroot and goats cheese napoleons

These went down an absolute storm, with adults and children alike. They are so delicious! I made them a little too ahead of time, so the goats cheese filling went a bit pink too. When they are freshly made the white goats cheese contrasts beautifully with the beetroot. I am definitely going to make these again with beetroot from my allotment, where I grow a range of different types of beetroot.

For speed you could make them with those packets of pre-cooked beetroot. I also used whatever vinegar I had in the cupboard as I didn’t have rice vinegar. I also didn’t bother with the dressing. And I put skewers in the stacks to help with eating.

Recipe from Saveur.com – check it out here

Pears with blue cheese and prosciutto

These are very simple, and lovely and fresh. I used dolcelatte cheese, which is quite mild, and I didn’t bother adding in the rocket. I also didn’t bother with the lemon juice because I was serving them straight away.

Recipe from Realsimple.com – you can find it here

Goats cheese and asparagus frittata

Super simple and quick to make. I didn’t have as many eggs as the recipe said, so I just used what I had and made it in a small pan. I added random herbs from my garden. You could add any veg or cheese you like.

Recipe from thecooks pyjamas.com – see here

Scotch quails eggs

No photo for these – I forgot to take one, and they had disappeared by the time I remembered!

It’s nice to have a hot canapé as well as the cold ones. And these are perfect two bite scotch eggs. The recipe is for 12 eggs, but I used a pack of 6 sausages, and managed to make 20 scotch eggs.

I made them up to the point of frying, and then baked them just before we needed them.

A top tip when putting the flour, egg and breadcrumbs onto the sausage covered eggs is to have one hand for wet and one hand for dry. So (for example), with your left hand toss the egg in the flour, then pick it up with your left hand and drop it into the egg. Pick it up and toss it with your right hand, then pick it up with your right and drop it into the breadcrumbs. Toss it with your left hand and then pick it up with your left and drop it into the frying pan.

I used a frying pan and a small amount of fat. I do think it would be better to deep fry them to get a more even colour.

Recipe from Good Housekeeping. Recipe here

Caprese bites

Super simple, super quick and popular! Just thread a cherry tomato, a bocconcini (tiny mozzarella ball) and a basil leaf onto a skewer.

I served them on a large wooden platter, and bought some nice bamboo cocktail sticks from Amazon to make them look a little more special. They disappeared in no time, and I was really pleased with how they looked and tasted.

Related posts: Tiny Gingerbread Houses, Cherry and Amaretto Pavlova, Chocolate and Blackberry Fraisier

Tiny Gingerbread Houses

Standard
Tiny Gingerbread Houses

If, like me, you are a Pinterest addict, you will no doubt have seen lots of lovely photos of tiny gingerbread houses beautifully balanced on mugs.

I’ve wanted to make them for ages, so I ordered a set of cutters online from eBay. I think they came from China!

Once they arrived I used the recipe in the Biscuiteers book that I mentioned in the Iced Biscuits (Cookies) post. It’s got treacle, and a range of spices in it, and I doubled the ginger, and added the grated zest of an orange, which was a genius move, because it tasted great. I didn’t want to over mix it so it was a bit streaky when I rolled it out, but it got less so when I gathered up the scraps and re-rolled it. The recipe is here. I also recommend checking the biscuits after 12 minutes (the recipe says 14-18, but I find that a bit long).

I used this new rolling pin with the rubber rings round the end to get an even thickness all round – the only disadvantage is that it’s a bit small, so you can’t do a massive piece of dough all at once.

The cutter is a front/back, side and roof. You need two of each per house. If you’re sensible (unlike me), you will cut an equal number of each so you have complete houses. Of course I didn’t and ended up with a few odd pieces, which were the cooks treat, and good for testing the icing before committing to the houses!

A baker friend recommended using meringue powder to make the icing, so I bought a tub from The Vanilla Valley. It’s known as Meri White. It means you don’t need egg whites, so don’t get loads of left over egg yolks. It was really easy, and once I had followed her recipe (1kg icing sugar, 10tbsp meringue powder, 180ml water) I then added orange juice to water it down to the right consistency – so it enhanced the orange in the biscuit. Note this makes a lot of icing – but you can freeze it, and it works just as well when you’ve defrosted it as it does fresh. Some people use less meringue powder, but my friend recommends the recipe from Sweet Ambs, who says it gives more stability, and stops the icing crusting over so quickly before you use it.

We iced the individual pieces first, and left them to dry before building the houses. My 8 year old particularly enjoyed this bit – not sure how much arrives on the biscuit, and how much in her mouth! I think I cut the hole in the icing bag a bit big, but pretty pleased with the results.

She went off to bed once we had done this bit, and I stuck them together later on.

I just piped thick lines of icing on the joins and stuck them together.

I left them to dry for a while before adding the roof.

And then added extra icing as snow along the ridge and edges.

Here they are decorating the table at my Sister’s before they got rapidly consumed by a load of kids.

And of course the obligatory shot of one on a mug! They were a bit big for that – so check the size of your cookie cutter before you buy it, but they made great table decorations.

Related posts: Iced Biscuits (Cookies)

Cherry and Amaretto Pavlova

Standard
Cherry and Amaretto Pavlova

I made this for an early Christmas dinner that we had recently. My Sister in Law is gluten free, and I wanted to make something she could eat. It’s also pretty easy, looks great, and tastes amazing. There is alcohol in it, but not so much that anyone is going to get drunk, (our kids ate it), but you can leave it out or replace it with almond essence if you prefer.

Cherry and almond is one of my favourite flavour combinations, in fact anything with cherries is good in my book. Though if we’re being strictly truthful, amaretto is actually made with peach kernels not almonds.

You could replace the almond with chocolate if you want something more Black Forest gateau flavoured.

On top of the eggs and sugar for the meringue, you need almond extract, amaretto, a large pot of double cream (600ml), 400g fresh cherries (pitted), 200g fresh raspberries (you can use just cherries if you prefer, but I like the freshness of the raspberries too) and a jar of Cherries in kirsch. I used these from Lakeland. Sainsbury’s also do some as do Waitrose and probably loads of other places. Drain them and cut them in half. Beware it’s a sticky job.

I used my trusty meringue recipe, which you can find here, added a teaspoon of almond extract at the very end. I use the Sainsbury’s French Almond one, which I think is great – make sure you use extract not essence as essence is not a natural product. I then divided it into three circles of about 20cm – I drew round a small plate onto the underside of some parchment paper. If you want it to be taller – make four smaller circles.

To add a lovely flavour I made a purée by blending a handful of the fresh (pitted) cherries (about a handful) and a handful of the raspberries, sieving them to get rid of the seeds, and boiling to reduce it down a bit.

I then splodged it onto the meringue circles and swirled it around with a wooden kebab stick.

I try and bake meringue on as low a heat as possible. My own only goes to 80 degrees centigrade, so I use that. It takes several hours to dry out the meringue. The cream will soften up the meringue, so I wanted it to be quite crisp and baked for around 3 hours.

Once the meringue disks are cold it’s time to start layering up. If you want the meringue to stay crisp, leave this till just before you serve. I made mine several hours before we ate, and the meringue went very soft (and still very delicious!).

Add a couple of tablespoons of icing sugar to the cream. Whip the cream to soft peaks and add some amaretto to taste. Beware – it tastes amazing!

Put a little bit of cream on the plate you are going to use and stick the worst looking meringue to the cream. This will stop it sliding around. Add some cream and spread it around to the edge of the disk.

I placed a row of kirsch cherries around the edge, and filled in the middle with the fresh cherries and raspberries- push them down a little into the cream the put more cream on the top so the layer is quite smooth.

For the other layer I placed fresh cherries around the edge and kirsch cherries and raspberries in the middle.

Add the final layer on top, add some cream in the middle of the layer (to help the fruit to stick) and make a lovely pile of the remainder of the fruit.

Don’t worry if any of the layers crack (mine did), just stick them back together with a bit of cream. It’s very forgiving!

Refrigerate until you’re ready to eat. I left mine a little long, and it travelled in a car, so became a little soft and squishy. But it still tasted amazing!

I will most definitely be making it again when I have some of my home grown cherries and raspberries next summer.

Related posts: Christmas Canapés, Tiny Gingerbread Houses, Cherry and Amaretto Pavlova

Chocolate and Blackberry Fraisier

Standard
Chocolate and Blackberry Fraisier

We had an early Christmas dinner in our family this year, as some of us are not going to be around on Christmas day.

I was responsible for starters and desserts, and I came across this blackberry fraisier recipe in a Christmas pull-out in Good Housekeeping recipe, which can be found here.

I’ve wanted to make a fraisier since I saw it in bake-off one year.

There are a lot of different steps and layers to get ready so you can layer it all together at once – it needs to chill for at least 4 hours, and preferably overnight, so make sure you plan ahead.

The cake is a genoise sponge where you whisk the eggs and sugar to within an inch of their lives, and then fold the rest of the ingredients in. You do lose a little volume when you do this, as it takes a while to get them properly combined, but it still makes a lovely airy cake.

The next step as creme patisserie (ore creme pat as you always hear it referred to on bake off). I’ve never made it before, and it wasn’t overly difficult, though quite hard work on the arm with all the beating!

I did find that when I left it to cool it became overly heavy and solid, so I emptied out of the piping bag, added some milk – gave it a good beating, sieved it, and it turned out perfect! So I would say that you could reduce the amount of corn flour that the recipe recommends, and it would be just fine.

You have to make a liquid to soak the cake – the recipe has lemon juice, sugar and cassis in it, I skipped the lemon juice, added a bit of water, and used creme de mures (blackberry liqueur) instead – it worked fine!

The second to last layer is marzipan – I used bought, and I recommend using more than the recipe suggests. I found it quite hard to roll the amount recommended out to the right size – so use more, and then trim it off!

The glaze is the final thing – it was a bit lumpy when it cooled (I think it was the cocoa that hadn’t dissolved properly), so I sieved it. I probably use my sieve just as much for smoothing our lumpy mixtures as I do for sifting flour! It ran a little over the edges, so if you want a super professional finish, maybe add an extra sheet of gelatine, which will help it be more set.

It’s fun to stack it all together. You do it in the tin (without the bottom), and then remove it after chilling. I forgot to take a photo of each layer, so here is the beginning and end!

I love how it looks, and it tastes absolutely delicious!

I would definitely recommend it as a Christmas Day or dinner party centrepiece, and you could use a different fruit if you can’t get hold of blackberries (which are not in season in December, so harder to get hold of).

Related posts: Christmas Canapés, Tiny Gingerbread Houses, Cherry and Amaretto Pavlova

Making Leaf Mould

Standard
Making Leaf Mould

I’ve had a couple of tries making leafmould in black plastic bags, but with little success. They just seem to become dried out leaves, so I thought I would read up on, and try and do it properly.

It’s November 2018, and there are loads of trees around the edge of the allotment site that have dropped their leaves. So I just pootled around for an hour or so, raking them into big piles, and taking them by the wheelbarrow-full to my plot. Look at the colour of these beauties!

I built a huge pile – it was about 6ft in diameter and 4ft high. I tried to get a mix of leaves from different types of tree, and some were definitely wetter than others.

I was going to build myself a leafmould cage, but for only a little bit more than the raw materials, I picked up this one from Primrose. It’s 90cmx90cmx90cm, which apparently makes it 792 litres volume. It was a doddle to put together, with pre-drilled holes for 3 screws on each corner join.  I’m not sure if they still stock it – but there are lots of similar ones here on Amazon.

I then put it in place down the side of the shed, and started to fill it up. I picked up the leaves using this handy set which I bought from the Wisley plant shop. It’s a bit like a dustpan and brush, but with a rake instead of a brush. You can pick up loads – much more than if you are using your hands. It’s made by Burgon and Ball, who I have to confess I am a huge fan of – their stuff is always great quality (and no, this isn’t a sponsored post!).  I’m not sure they if they still make it, but there is a similar one here on Amazon.

I scooped the leaves into a couple of large garden bags (like these), and dumped them in the cage – which was a few metres from the pile of leaves – bad planning on my part – should have put the pile next to where I was going to put the cage!

After each bagful, I gave the leaves a good strim to break them up (apparently it helps them to compost quicker if you do that), and then soaked them with water. I used the dirty water from the metal bath/container thingy that sits under the tap at the allotment. Not sure if it will help speed things up, but I don’t suppose it will do any harm.

This is how the massive pile compacted down, just with strimming and water.

And you can see they have compacted again when I pushed them down a little to put the cardboard on top. I plan to top it up with more leaves when I get chance, but I’m pretty pleased with what I’ve got so far. Not bad for a couple of hours work.

Now I just have to keep an eye on it to make sure it doesn’t dry out, and I may add some coffee grounds, as I hear that also helps.

Would love to hear your top leafmould tips…

Two weeks later update – I acquired a load of coffee grounds from Starbucks, and thought I would add them and top up the cage at the same time.

Interesting to see how much it had gone down just in two weeks. We’ve had a lot of rain, so they are nice and damp.

And here it is nice and full again – I added four barrowloads to get it up to this point.

Let’s see how it gets on with the coffee added. I’m also curious to know how heat has an impact as apparently it’s a fungal breakdown that happens to the leaves, and I would have thought that heat would help. I’m considering putting a layer of bubble wrap around it for the winter (if I have any spare from doing the greenhouse).

Mid-December update. Only a month or so after first filling the bin, and then topping it up again a few weeks later, this is what it looks like. It’s like the amazing disappearing stack!

My Sister has given me three of these lovely big sacks – all at least half filled with wet, and pretty compacted leaves.

So I added them to the bin – I forgot my strimmer, so they’ve gone in whole. Nice and full again!

Update – 1st September 2019

Look how much they have shrunk down

I was a bit disappointed as it looked like it was still whole leaves. BUT when I scraped the surface look what I found

Black gold! And all I did was collect and strim the leaves, add some coffee grounds, and occasionally chuck a bucket of water over them if I thought they were a bit dry.

I am beyond excited, and will definitely use this lot in the raised beds, and refill the cage when the leaves fall this year.

Iced Biscuits (Cookies)

Standard
Iced Biscuits (Cookies)

I have long been impressed by those immaculately iced biscuits (cookies to our American friends) that you see on Pinterest and in fancy stores, so I thought I’d have a go and see if I could make some.

I then stumbled across a book by the biscuit geniuses at Biscuiteers in Nymans National Trust second hand bookshop. And it seemed like fate.

So one Saturday, my daughter and I donned our aprons and made the vanilla biscuit recipe from the biscuiteers book (it’s also online here). Except we replaced most of the syrup with honey because we didn’t have much syrup. Not sure it made any difference – you couldn’t taste the honey, and the texture was great.

We split it in two, and rolled it out between two pieces of parchment paper. To about 5mm thick.

We used a random assortment of cutters (obviously mini-me insisted we had to include a unicorn!)

This batch came out just right. The second batch were a little darker. Just as tasty, but a slightly different flavour.

They didn’t take long to cool, and we popped them in a Tupperware container overnight, ready to ice the following day.

We used the biscuiteers royal icing recipe (see here), made with fresh egg whites. My trusty KitchenAid made short work of whipping up a batch, which we then watered down slightly and added a variety of Wilton food colouring gels. We also added some gold lustre dust to some golden yellow icing, which gave it a lovely subtle sheen.

To make the black icing we added cocoa powder to the icing to darken it, before adding black food colouring. It worked really well.

A top tip is to stick some clingfilm directly on top of your icing to keep it from drying whilst you aren’t using it.

There are two main types of icing when you are making biscuits. Line icing and flooding icing. Basically you make a border with the line icing, and flood it (fill the border) with the flooding icing. Line icing is also used for making patterns/detail on top after you have flooded the biscuit. The line icing is stiffer than the flooding one, but some people use the same icing to both outline and flood.

I tried making a mix of line icing, flooding icing, and something in between that could be used for both.

We popped the colours in icing bags, and some white flooding icing in a squeezy bottle, which I had bought online. It works really well, and I’d definitely recommend getting a couple.

You can see in the picture below the outline (which you leave for a few minutes to dry before flooding), and the flooding which hasn’t quite made it to the edge on the head.

Toothpicks are great for helping it spread a little. As is banging it gently on the table, or jiggling it quickly from side to side (yes really!). Though we did lose a few unicorn horns that way!

Leave the flooded biscuit for about 20 minutes to dry before adding decoration on top. Unless you’re doing some marbling, in which case do it straight away. I piped lines on it and then zigzagged through them to create the marble. Be careful not to add too many colours or overmix, otherwise you end up with a sludge colour (see the dress!).

And here are our results. Far from perfect, but I learnt a lot, and I’ve already got some ideas about what I would do differently next time.

I think this is my favourite…

The texture of the icing is absolutely key, and I’m a bit lazy, so am drawn to the idea of having the same texture icing for both outlining and flooding. A bit more experimenting required to get it just right. The teal and gold ones were the closest to this. The orange was too stiff to flood properly. I think if you wanted to do really fine decorating then you would need the line icing texture.

The size of hole I cut in the piping bag was also crucial. Some of them were a bit big.

And you really have to plan ahead in terms of which bits to outline in what colour, what to flood, what to add on top. We traced round the cutters and drew out designs to help us plan things out.

And my final top tip – we spread oilcloth on the table, and it was a great idea. Food colouring is a nightmare to remove!

I loved it, and I think I have developed a new obsession. I can’t wait to try again!

Related posts: Tiny Gingerbread Houses