Category Archives: Garden

Inspiring Gardens – West Dean

Standard

I love to go to different gardens to inspire me, and I’ve been wanting to visit West Dean since I saw photos of it in Jake Hobson’s book about Cloud Pruning. An Easter camping trip to West Sussex provided the perfect opportunity.

I have to say, it didn’t disappoint. The pruned box was amazing, and even though it was only mid April the whole place looked gorgeous!

And because I’m an RHS member, entry was free!

So no more text, just some pretty pictures to drool over. I hope it inspires you as much as it did me.

20140421-205040.jpg

20140421-205107.jpg

20140421-205129.jpg

20140421-205159.jpg

20140421-205220.jpg

20140421-205245.jpg

20140421-205312.jpg

20140421-205336.jpg

20140421-205356.jpg

20140421-205418.jpg

20140421-205443.jpg

20140421-205500.jpg

20140421-205519.jpg

Two Fruit Cheeses

Standard

With the recent glut of fruits available I decided to have a go at making a couple of different fruit cheeses.

The first I attempted was damson cheese with some cute little damsons I bought from my fantastic local farm shop Priory Farm which is frequented by none other than Dame Judy Dench.

I used a recipe from Vivien Lloyd, which can be found here.

It’s pretty straightforward. You just cook the damsons with some water until they are soft.

20131015-193533.jpg
Then push them through a sieve.

20131015-193651.jpg
Weigh the purée and then pop it back in the pan and cook until it is thick.

20131015-193910.jpg
Then add the same weight sugar as purée and cook until it is thick and glossy and when you push the spoon along the bottom of the pan it leaves a clear trail.

20131015-194222.jpg

I put mine into sterilised small jars which I bought from The Bristol Bottle Company.

20131015-194622.jpg

I also put a bit into silicone chocolate moulds to make small sweets.

20131015-194732.jpg
Which I subsequently covered in chocolate.

20131015-194842.jpg

I’ve not tasted the stuff in the jars yet (they will be Christmas presents), but the chocolate covered sweets were absolutely delicious.

And last night I made pear and apple cheese with a recipe from the fabulous Pam Corbin from River Cottage. The recipe is on the channel 4 website here

The apples were some of the ones me and the little munchkin picked from RHS Wisley

The technique was basically the same, except I had to peel, chop and core the apples and pears before cooking them. And she recommends a smaller amout of sugar (75% of the weight of the purée). This might be because these fruits are naturally sweeter than damsons.

I cooked them

20131015-195720.jpg
Pushed them through a sieve.

20131015-195819.jpg
Using a ladle is a top tip.
Cooked with the sugar (I also added a cinnamon stick)

20131015-195946.jpg
Until it was thick, glossy and much darker than before.

20131015-200109.jpg
This time I filled six small jars, a silicone 6 cupcake tray (brushed with a little glycerine which is supposed to make it easy to turn out), and a small loaf tin lined with grease proof paper. With the loaf tin I poured it about 3cm deep, and I intend to cut it into cubes and either roll in sugar or dip in chocolate.

I’m leaving them all for several days to be properly set, and will then turn out the cupcake tray and loaf tin. I will add extra photos then!

20131015-200917.jpg

Yum yum!

Pink Wendy House

Standard

My lovely girl is a sucker for a Wendy House, and I wanted to create a little corner of the garden just for her.

The bottom left hand corner of the garden gets sun in the morning, but is quite shady in the afternoon because the neighbour has built a massive wall (due to a dispute with the previous owner of my house!!). I thought that would be the perfect spot.

There was a bed of raggedy looking shrubs and general greenery against the wall. So I paid some men to clear the biggest stuff away for me as some of the roots were enormous, and I had learned my lesson after trying to clear the front garden hedge (see previous post).

I decided to pave over some of the bed, meaning I could push the Wendy house back, almost against the wall.

I then dug it out a bit and dug out the bricks that were creating a little wall at the edge of the bed (any job that requires a lump hammer is satisfying). Trying to make it as level as possible.
20130716-213837.jpg
20130716-214110.jpg

I then added weed suppressant fabric, which I pegged down.

20130716-214350.jpg
Then added sharp sand, and finally the slabs, which I nicked from the other side of the garden as I wanted to widen the border on that side.

20130716-214648.jpg

I tried to get it as level as possible using my spirit level. Which involved lifting the slabs and scraping out sand at various points, and jumping up and down on them, which was fun.

The Wendy house is a Pixie playhouse from The Shedstore website. It’s quite big (6ft x 5ft) because I wanted something that she won’t outgrow too quickly.

I painted the back and sides before construction, as I knew access to the back in particular would be difficult once constructed. I also painted the underside of the floor to give it extra protection.

20130716-215503.jpg

20130716-215540.jpg
Sweetpea by Cuprinol in case you are wondering! I also discovered something interesting about Cuprinol shades during this process. It’s best to put a second coat on quickly if you are going to do more than one coat. If you leave it too long (over about 6 hours) then the second coat does a funny separating thing. I emailed cuprinol to ask why, and they said that once it dries fully it forms a wax coating that repels the second coat. I think if your wood is rough or very dry and absorbent then it wouldn’t be a problem as the first coat soaks in. But as the Wendy house had already been treated then it probably wasn’t very absorbent.

Anyhow, with hindsight, I painted the wrong bits before construction. If I was to do it again I would paint the back, front, windows and doors (including the window batons), balustrade (if that’s the right term for the rails at the front), corner pieces and roof edges. In fact pretty much all of it! All of these were very fiddly to paint once constructed, and I would have made a better job if I had done it beforehand. Particularly as I was painting bits of it in a different colour (Cuprinol Natural Stone). The sides are actually easy to paint when constructed!

I painted the floor once I had put it in position.

20130716-221213.jpg

Then following the instructions, I carefully put it together. It wasn’t overly difficult, and it says you need two people, but I did it in my own. I just used garden chairs to prop things upright when needed.

20130716-221436.jpg
Adding the door

20130716-221753.jpg
Chiselling out for the window hinges (actually easier than I thought).

20130716-221930.jpg
Nailing the roof to the slats. Great stress reliever. Bit noisy for the neighbours.

20130716-222103.jpg
The walls are up! Note the strategically placed chairs.

20130716-222242.jpg
The roof is on! This is the only bit where I thought the instructions were a bit suspect. I couldn’t for the life of me get the inner batons to connect inside in the way they were described in the instructions and picture.

Anyhow, I decided it didn’t matter as the roof felt would cover the small gap at the apex. So I chucked it on and thought fuck it.

20130716-222535.jpg

The windows were fun to put in. I pre-painted the door and window frames and the beading (definitely recommend this step). And I glued the beading rather than using nails. I was enjoying it so much was doing it at 10pm in the half dark! I also glued the little diamond onto the apex as nailing caused it to split. Just general purpose wood glue.

After some fiddly painting to finish it off. This is what it looks like.

20130716-222635.jpg
As my Daughter would say ‘ta da!’

A tale of two sheds

Standard

When I moved into this place, it had the world’s largest shed. A proper man cave, it was actually a shed with an extension on the front, and was 20ft wide by 16ft deep.

20130706-212612.jpg
It wasn’t the best looking thing in the world, but I did have the idea of turning it into a summer house. Until I took a proper look at it.

According to the neighbours it had been up for about 20 years, and it was a bit rotten in places. So I decided to take it down. Which was easier said than done! As you can see from these photos which were taken during the demolition, it was actually well constructed, and at one point I thought it was going to fall into the neighbours garden! The shed was only a foot from the fences of three different neighbours, so we could only attack it from the front.

First I got an electrician to take out all of the dodgy electrics so that I wouldn’t get electrocuted.

Then my Sister’s boyfriend came to help, and it took us about 5 hours to kill the beast!

First the front came off. You can see the original shed at the back.

20130706-213008.jpg

20130706-213232.jpg

20130706-213343.jpg

20130706-213457.jpg
This was the trickiest bit – how to get the roof at the back down! It was thick chipboard with heavy duty felt on top (much thicker than regular roof felt) fastened down with proper nails rather than felt tacks. It took us ages to figure out a way

20130706-213614.jpg

20130706-213852.jpg
The answer was to saw through it in sections with the jig saw until we weakened it sufficiently to pull it down. At one point it was leaning precariously to the left, right next to the neighbours shed.

All of this was achieved with two people, a lump hammer, an iron bar, a cordless drill and a jig saw (a complete life saver – couldn’t have done it without this). Oh and a rope which we used to pull it down and to stop it toppling sideways into the neighbours garden.

As you can see from the last picture, I ended up with a huge pile of wood to deal with. I had a moment of inspiration, and decided to freecycle it as much of it was in quite good condition. The response was brilliant and I got rid of at least half of it. One lovely guy even sorted out which wood he wanted, then swept the floor! I then got a company to come and get rid of the rest. It cost me £180, which was cheaper than getting a skip, and I didn’t have to cart it all to the front of the house. Bargain! I had been quoted £1600 by a gardening company to pull it down and take it away. So I was quite happy with my saving!

To replace it I chose a cheap 8×6 shed from Shedstore. It cost about £220, and I paid an extra £99 to them for someone to build it for me.

The Shedstore website is easy to navigate, and delivery was pretty prompt. However, I’ve had a series of problems with the shed itself. As its a cheap shed, the quality isn’t great, so various bit have broken before the shed was constructed. So when the guys came to build it, some of the pieces were the wrong size and another broke. They were supposed to report this, but in fact it only got reported when I phoned up. I contacted Shedstore, and they were rubbish – basically ignored my email then blamed the manufacturer and told me to phone them.

Anyhow, eventually new pieces arrived and I arranged for the guys to come again and build it. They then discovered another broken bit. But fortunately we agreed they would screw it together and just build it. I couldn’t wait any longer. From order to it finally being built took about two months!

They dont contact you to arrange construction until the shed has been delivered. And then it can take several weeks to get a date. My advice would be to try and get round this by contacting them directly to book an appointment before the shed arrives. I did this when waiting for the replacement parts and it definitely speeded things up.

I have painted it in Seagrass and Jasmine White by Cuprinol, and am really happy with how it looks. I’ve only gone for one coat of the Seagrass as it has soaked in to the rough wood, and I like the current depth of colour. It looks like a little beach hut at the end of my garden. And matches beautifully the parasol I have over my patio furniture.

20130706-220728.jpg

On reflection, I would have spent more and gone for a proper tongue and groove shed. I particularly realised this when my daughters new playhouse arrived (more of that in another post) which was much higher quality. I definitely got what I paid for. But it’s cute and it does the job. Now I just have to try and fit everything that was in the old shed in the new one!

Patio chair cushions

Standard

I had a lovely time browsing in the shop at the gorgeous RHS Wisley, and they had some nice looking garden chair cushions.

20130514-202717.jpg
However, when I saw the price, I thought ‘I could do that’!

I measured the chair seat, and decided on the size I wanted (35cm square)

I had some quite sturdy fabric from Ikea hanging around at home which I cut into rectangles (twice the width of the size of the cushion I wanted to make.) I added a 2cm seam allowance all round.

I sewed it with right sides together, leaving a gap on one side to insert the filling. I clipped the corners to create neater corners when it was turned the right way out. I then also zig zagged the edges together, except on the side with the gap where I zig zagged both edges individually.

20130514-203329.jpg

20130514-203812.jpg

I then turned it right way out and pushed the corners out so they were square.

To create the filling I folded four layers of polyester quilt batting together and stuffed it into the cover. I slip stitched the opening closed.

To create the quilting I used contrasting embroidery thread and tied knots at regular intervals, creating a 4×4 pattern.

20130514-204245.jpg

20130514-204343.jpg

And here are the finished articles.

20130514-204534.jpg

20130514-204623.jpg

20130514-204701.jpg
I particularly love the fact each one is a different pattern, and I’m hoping that as the filling is polyester that they will wash well too.

Japanese Inspired Garden

Standard

I have posted previously about the hedge at the front of my house, and I thought it was time to share a little about the garden itself.

When I moved in it looked like this.

20130511-140746.jpg

20130511-141012.jpg

20130511-141151.jpg
A fairly typical front garden with two bits of lawn, and rose bush in the middle of one patch of lawn (on the right). There is a wall with some mature evergreen shrubs in front in the left, and a raggle taggle mess of a hedge on the right.

It’s ok, but I wanted something more eye catching as the entrance to my house. I have a gorgeous Acer tree, love japanese gardens, and was given some books at Christmas that inspired me.

The first task was to remove the world’s scruffiest hedge, behind which I found the world’s scruffiest fence, which I gleefully kicked down (most satisfying!). I also started to remove the turf

20130511-221320.jpg

20130511-221513.jpg

The turf was relatively easy. I used a half moon lawn edger to cut spade sized squares, and then dug out each square with a sharp edged spade, trying to take as little earth as possible. This was in March, so the ground was quite soft, which made it quite easy.

The hedge was a nightmare. There were multiple different plants, and as I wanted to plant a new hedge, I needed to get all the roots out. It involved lots of digging, and my trusty branch loppers (is that the right term) for cutting through the roots. I gave up with two particularly difficult plants and paid someone to remove them. For £40 it was money very well spent. I also made numerous trips to the tip. I don’t know if its just me, but I find taking things to be recycled at the tip really satisfying. Great to have an estate car to carry it all in.

I then planted my new box hedge, which is the subject of a previous post. I plan to cloud prune it, and recently bought Jake Hobson’s book to inspire me.

Once the hedge was in I levelled the ground as much as I could, weeded it and got laid some weed suppressant material, the thickest I could find. I pegged it down with some cheap plastic pegs from Wilkos. When calculating how much you need, don’t forget the need to overlap each strip by about 5cm.

20130511-222703.jpg

I got my blue slate chippings and Scottish cobbles online from Decorative Aggregates. They were the cheapest I could find. With free delivery. Though they did stuff up the delivery (twice!).

My gate was too narrow to fit the bulk bag through, so it sat on the pavement outside my house. Thank god for tolerant neighbours.

20130511-223103.jpg

Then came the hard work. At first I was able to split the bag and push the slate into my wheelbarrow. But once the slate level got lower than the wheelbarrow it was good old fashioned spade fulls into the wheelbarrow. Not too onerous though. All in all it took about 2.5 hours to do this side br />
20130511-223358.jpg

I still have the other side to do, and a bit of planting to soften the look, but this is what it looked like immediately afterwards. Note the slate is covered in dust from the quarry, so it looks very light.

20130511-223602.jpg

And after some rain.

20130511-223650.jpg

20130511-223717.jpg

I love the acer and I am adding more black bamboo to create a screen outside my window so people walking past can’t see in.

Weather permitting I will be doing the other side of the garden tomorrow, and will post an update with the finished article.

And yes, apart from some help removing some of the turf, and paying someone to get rid of the stubborn hedge plants, I did this all by myself. I think of it as my outdoor gym.

And here is an update for the other side.

From this

20130512-163824.jpg

To this

20130512-163920.jpg
I even found a nice sheltered home for Buddha.

20130512-170650.jpg

And the whole garden looks like this.

20130512-164104.jpg

I love it, and have had loads of compliments from the neighbours already 😃

Hedge Watch – Cloud Pruning

Standard

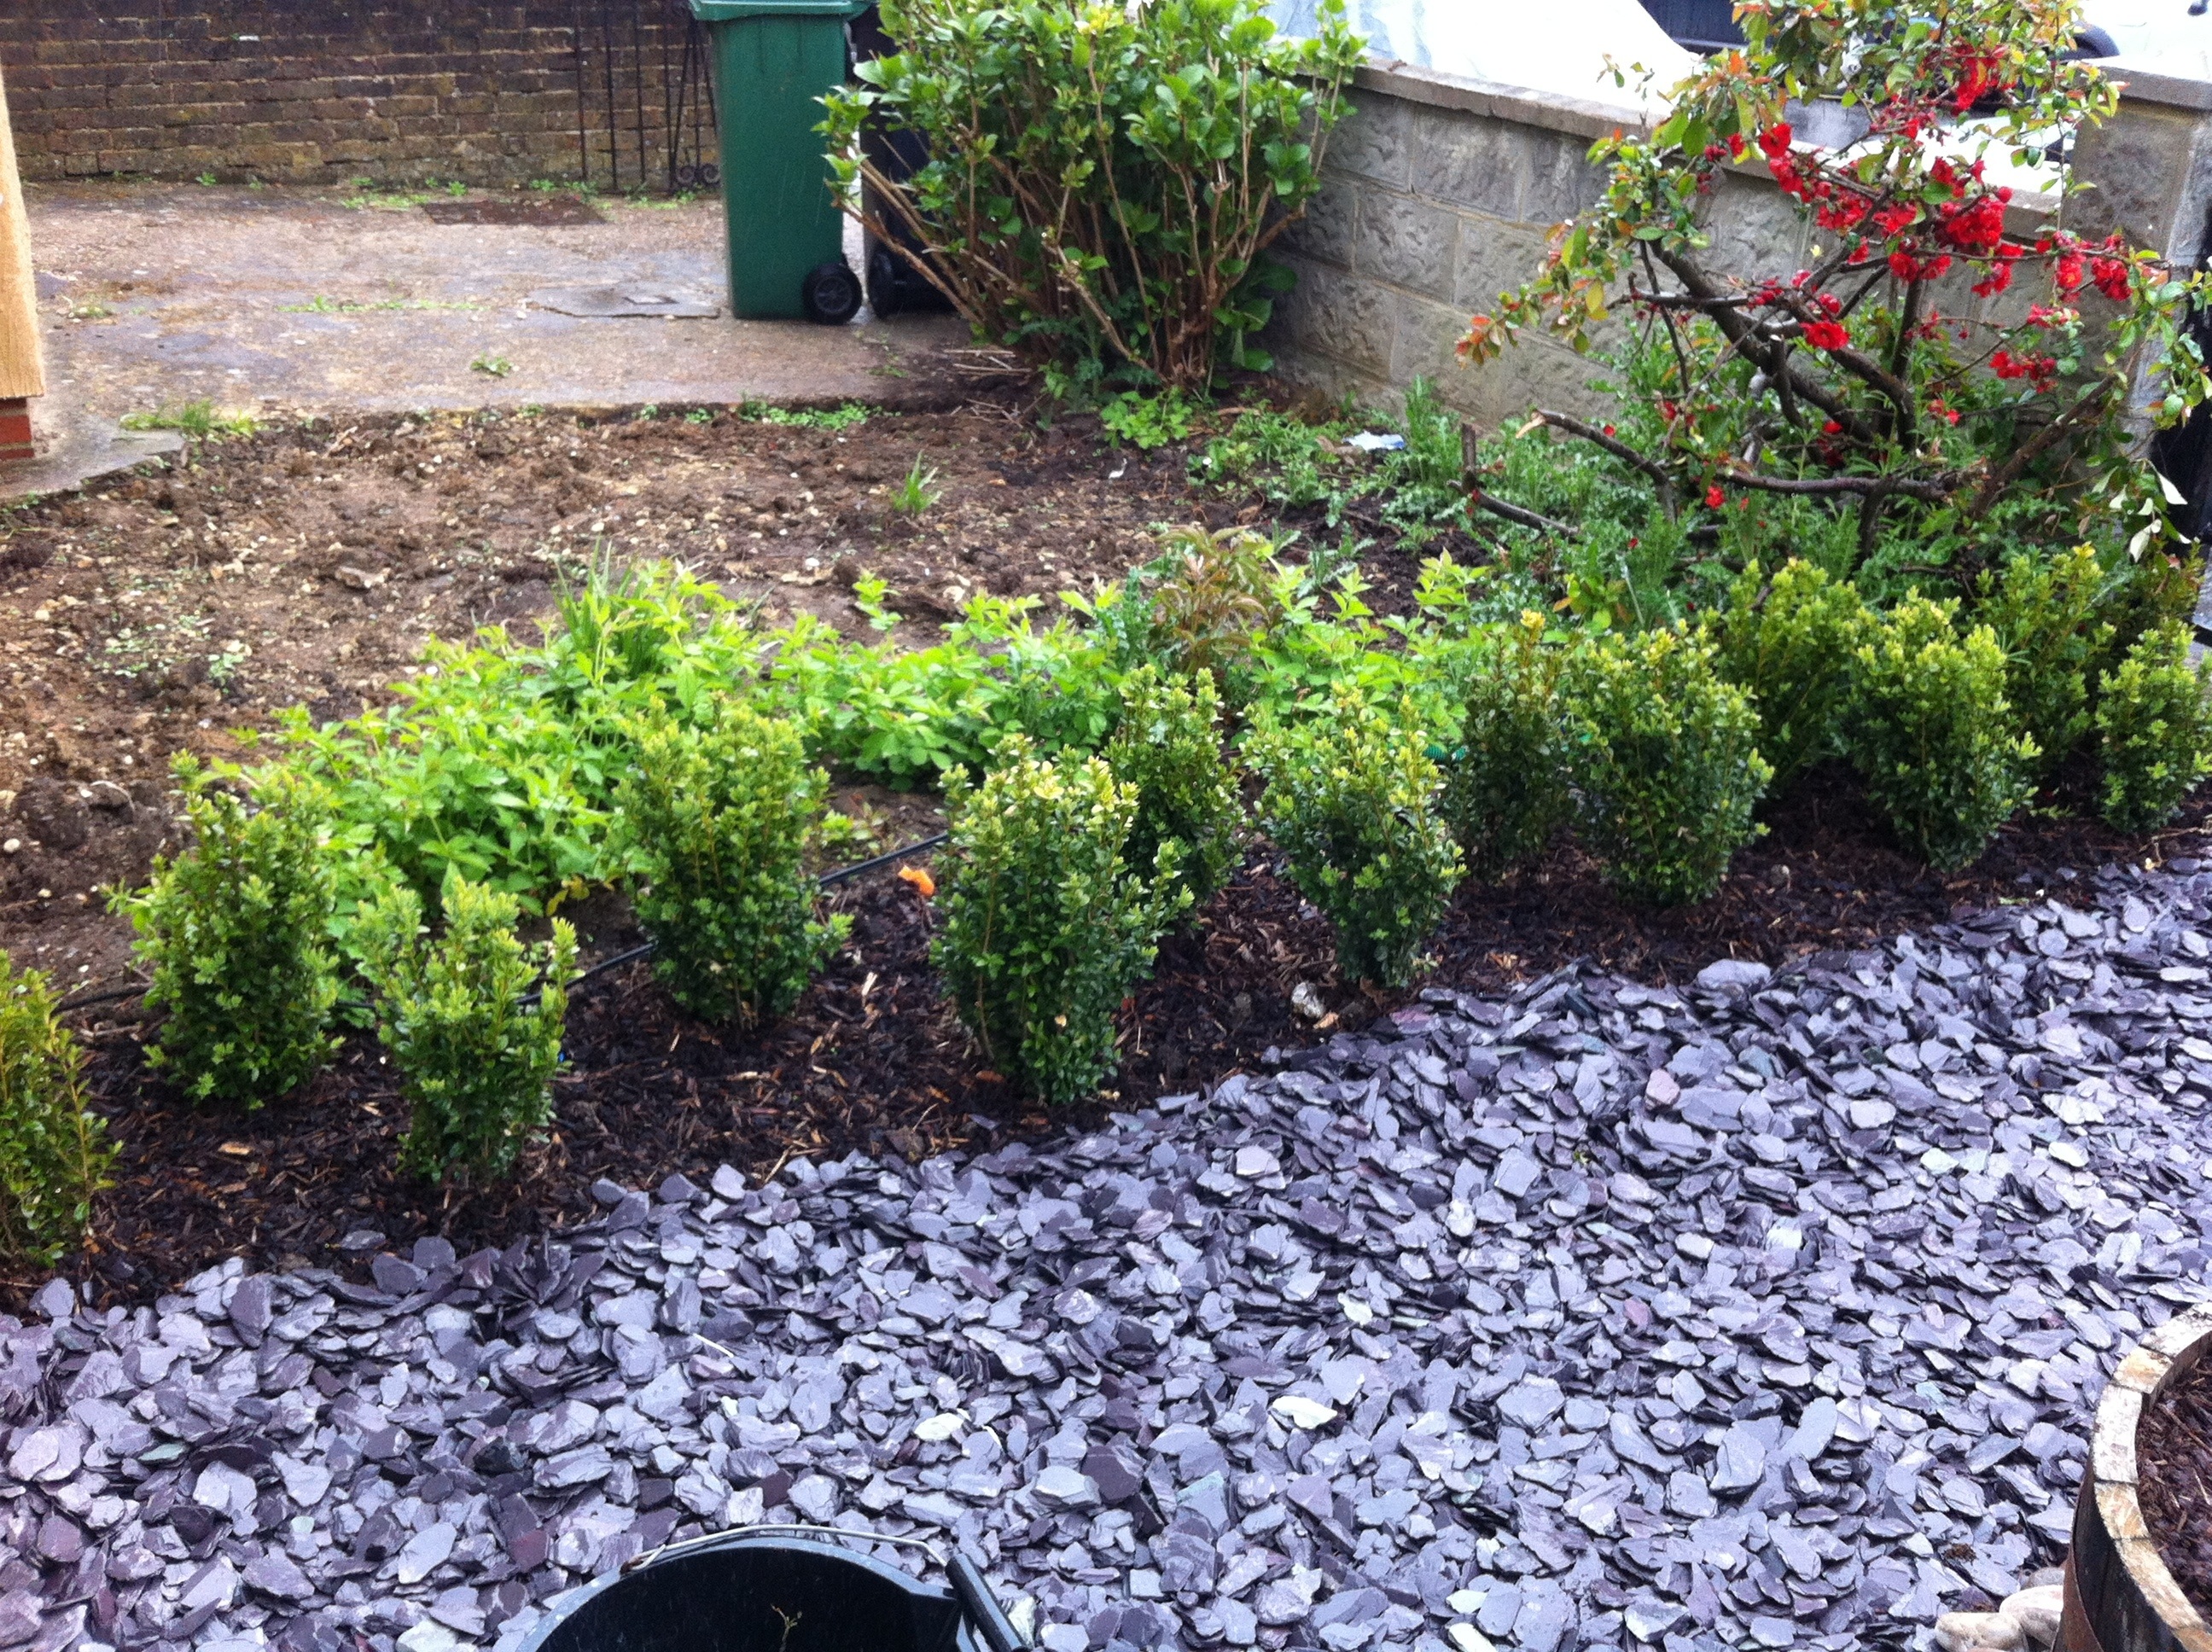
Phase one of re-vamping my front garden has been to remove all the grass and take down the tatty old hedge that was between my garden and the other half of my semi- detached house.

I found to my surprise that there was also a rickety old fence behind the hedge.

The hedge was a curious mixture of different plants, and was overgrown and wild. I am aiming for a Japanese inspired look, so have decided to plant a box hedge, with an aim to do some Jake Hobson style cloud pruning when it grows big enough.

It’s been back breaking work removing the turf and taking out the hedge. But now my new hedge is in, I think it’s been worth it.

I bought my box from Hedges Direct. I bought twenty 40-50cm bare root plants as I wanted to put in two staggered rows.

I dug some manure and bone marrow into the ground, and dipped the roots in Rootgrow which is a mycorrhizal funghi which is supposed to help establish strong plants. The plants are looking a little yellow on top because I bought them some time ago and put them (in bundles of 10) in pots of compost until I was ready to plant them. But they were in there for much longer than planned as the weather has been so terrible. I don’t think they loved it!

Anyhow, with the gorgeous weather today, I finally managed to plant them out.

I used 16 of the 20, and have potted up the rest to either have as spares incase any of them fail, or to practice my topiary skills!

I put them about 50cm apart. I’m a bit worried that the rows are too close together, but lets see. I also put some bark chips as mulch around the bottom, to suppress weeds and help keep moisture in.

My plan is to photograph the hedge each month to keep a record of growth.

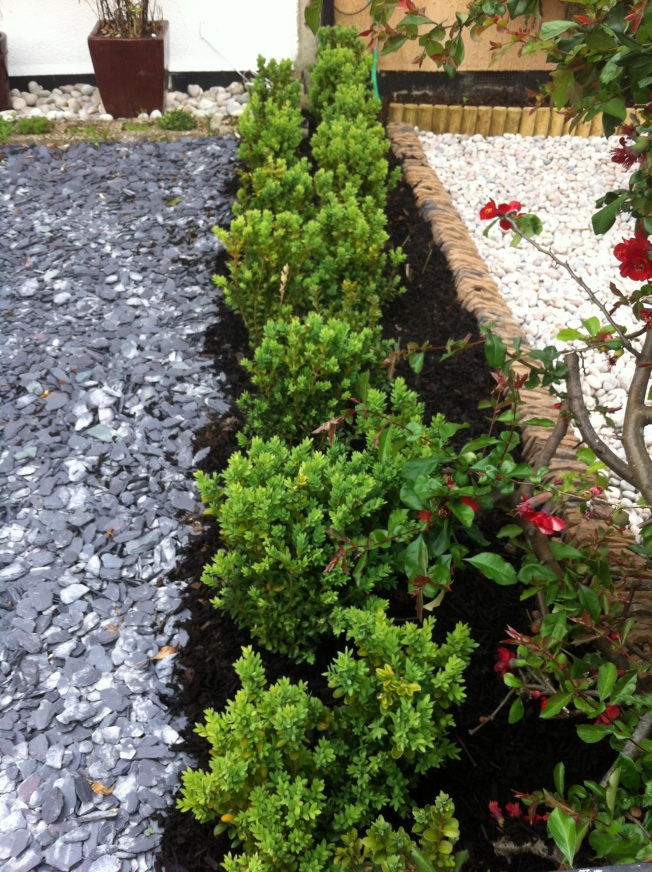
Here is day one (14th April).

20130414-212227.jpg

20130414-212340.jpg

I think it looks cute! What do you think?

2 weeks on (end April), looking a bit bushier and less yellow. I’ve been giving it lots of water as it’s been quite dry lately…

20130427-215125.jpg

20130427-215249.jpg

1 month on (11th May).

20130512-165944.jpg

20130512-170036.jpg

Quite a bit of new growth on them at the moment. I think I will give it a month and then start shaping them. I bought Jake Hobson’s book the other day and am feeling inspired. Here is an excerpt.

Update – June 9th. 2 months on. Neighbours have also been doing up their garden so it’s all looking quite nice out there.

20130609-173302.jpg

20130609-173356.jpg

20130609-173441.jpg

Update 3rd August. Today I added in three of the ‘spare’ plants I had been growing in pots. I wanted to fill some of the gaps.

This is what it looks like now

20130803-235024.jpg

20130803-235054.jpg

It definitely needs a trim. And I understand August is a good time to do it, so I’m going to start the cloud pruning process in a couple of weeks, and will post some photos then. I think I can see that some of the plants will make nice little balls, and others are skinnier, and will make good pyramids. Quite excited to have a go.

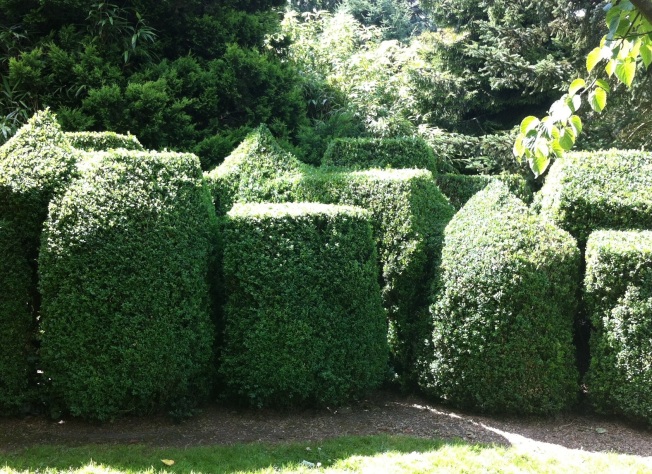
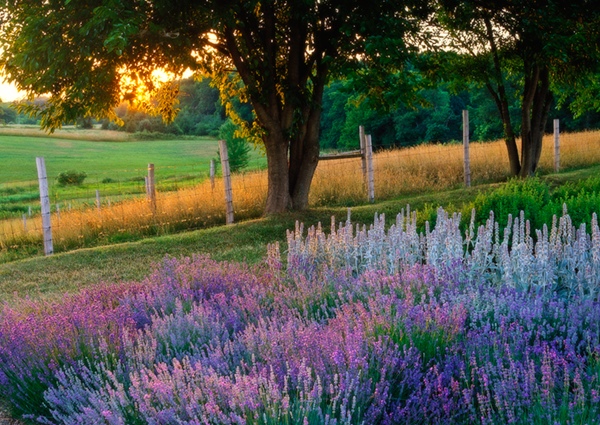
And here is some inspiration from Nymans Gardens in Sussex. Free form topiary! I think mine have a way to go before I can do this.

20130804-184610.jpg

20130804-184634.jpg

20130804-184714.jpg
And some cute tiny box balls, also at Nymans

20130804-184808.jpg

Update: end of May 2014. Which means the hedge is just over a year old. This is just after I’ve given it a little trim to encourage them to bush out. I’ve left some of them un-trimmed so that they grow taller and I start getting a cloud pruned shape. I thought it hadn’t grown very much, but looking back at the older photos, it really has!

20140526-163343.jpg

20140526-163353.jpg

And two years later. This is June 2015. It’s great to look back and see how much it has come on. It has put in masses of new growth this spring.


And after a haircut:

  I’m still trying to keep with the cloud pruning theme, and not create a boring regular box hedge. So I’ve trimmed them to different heights, and encouraged some to be taller and skinnier than others.
It’s certainly not quick growing a box hedge from scratch, but worth the wait!!

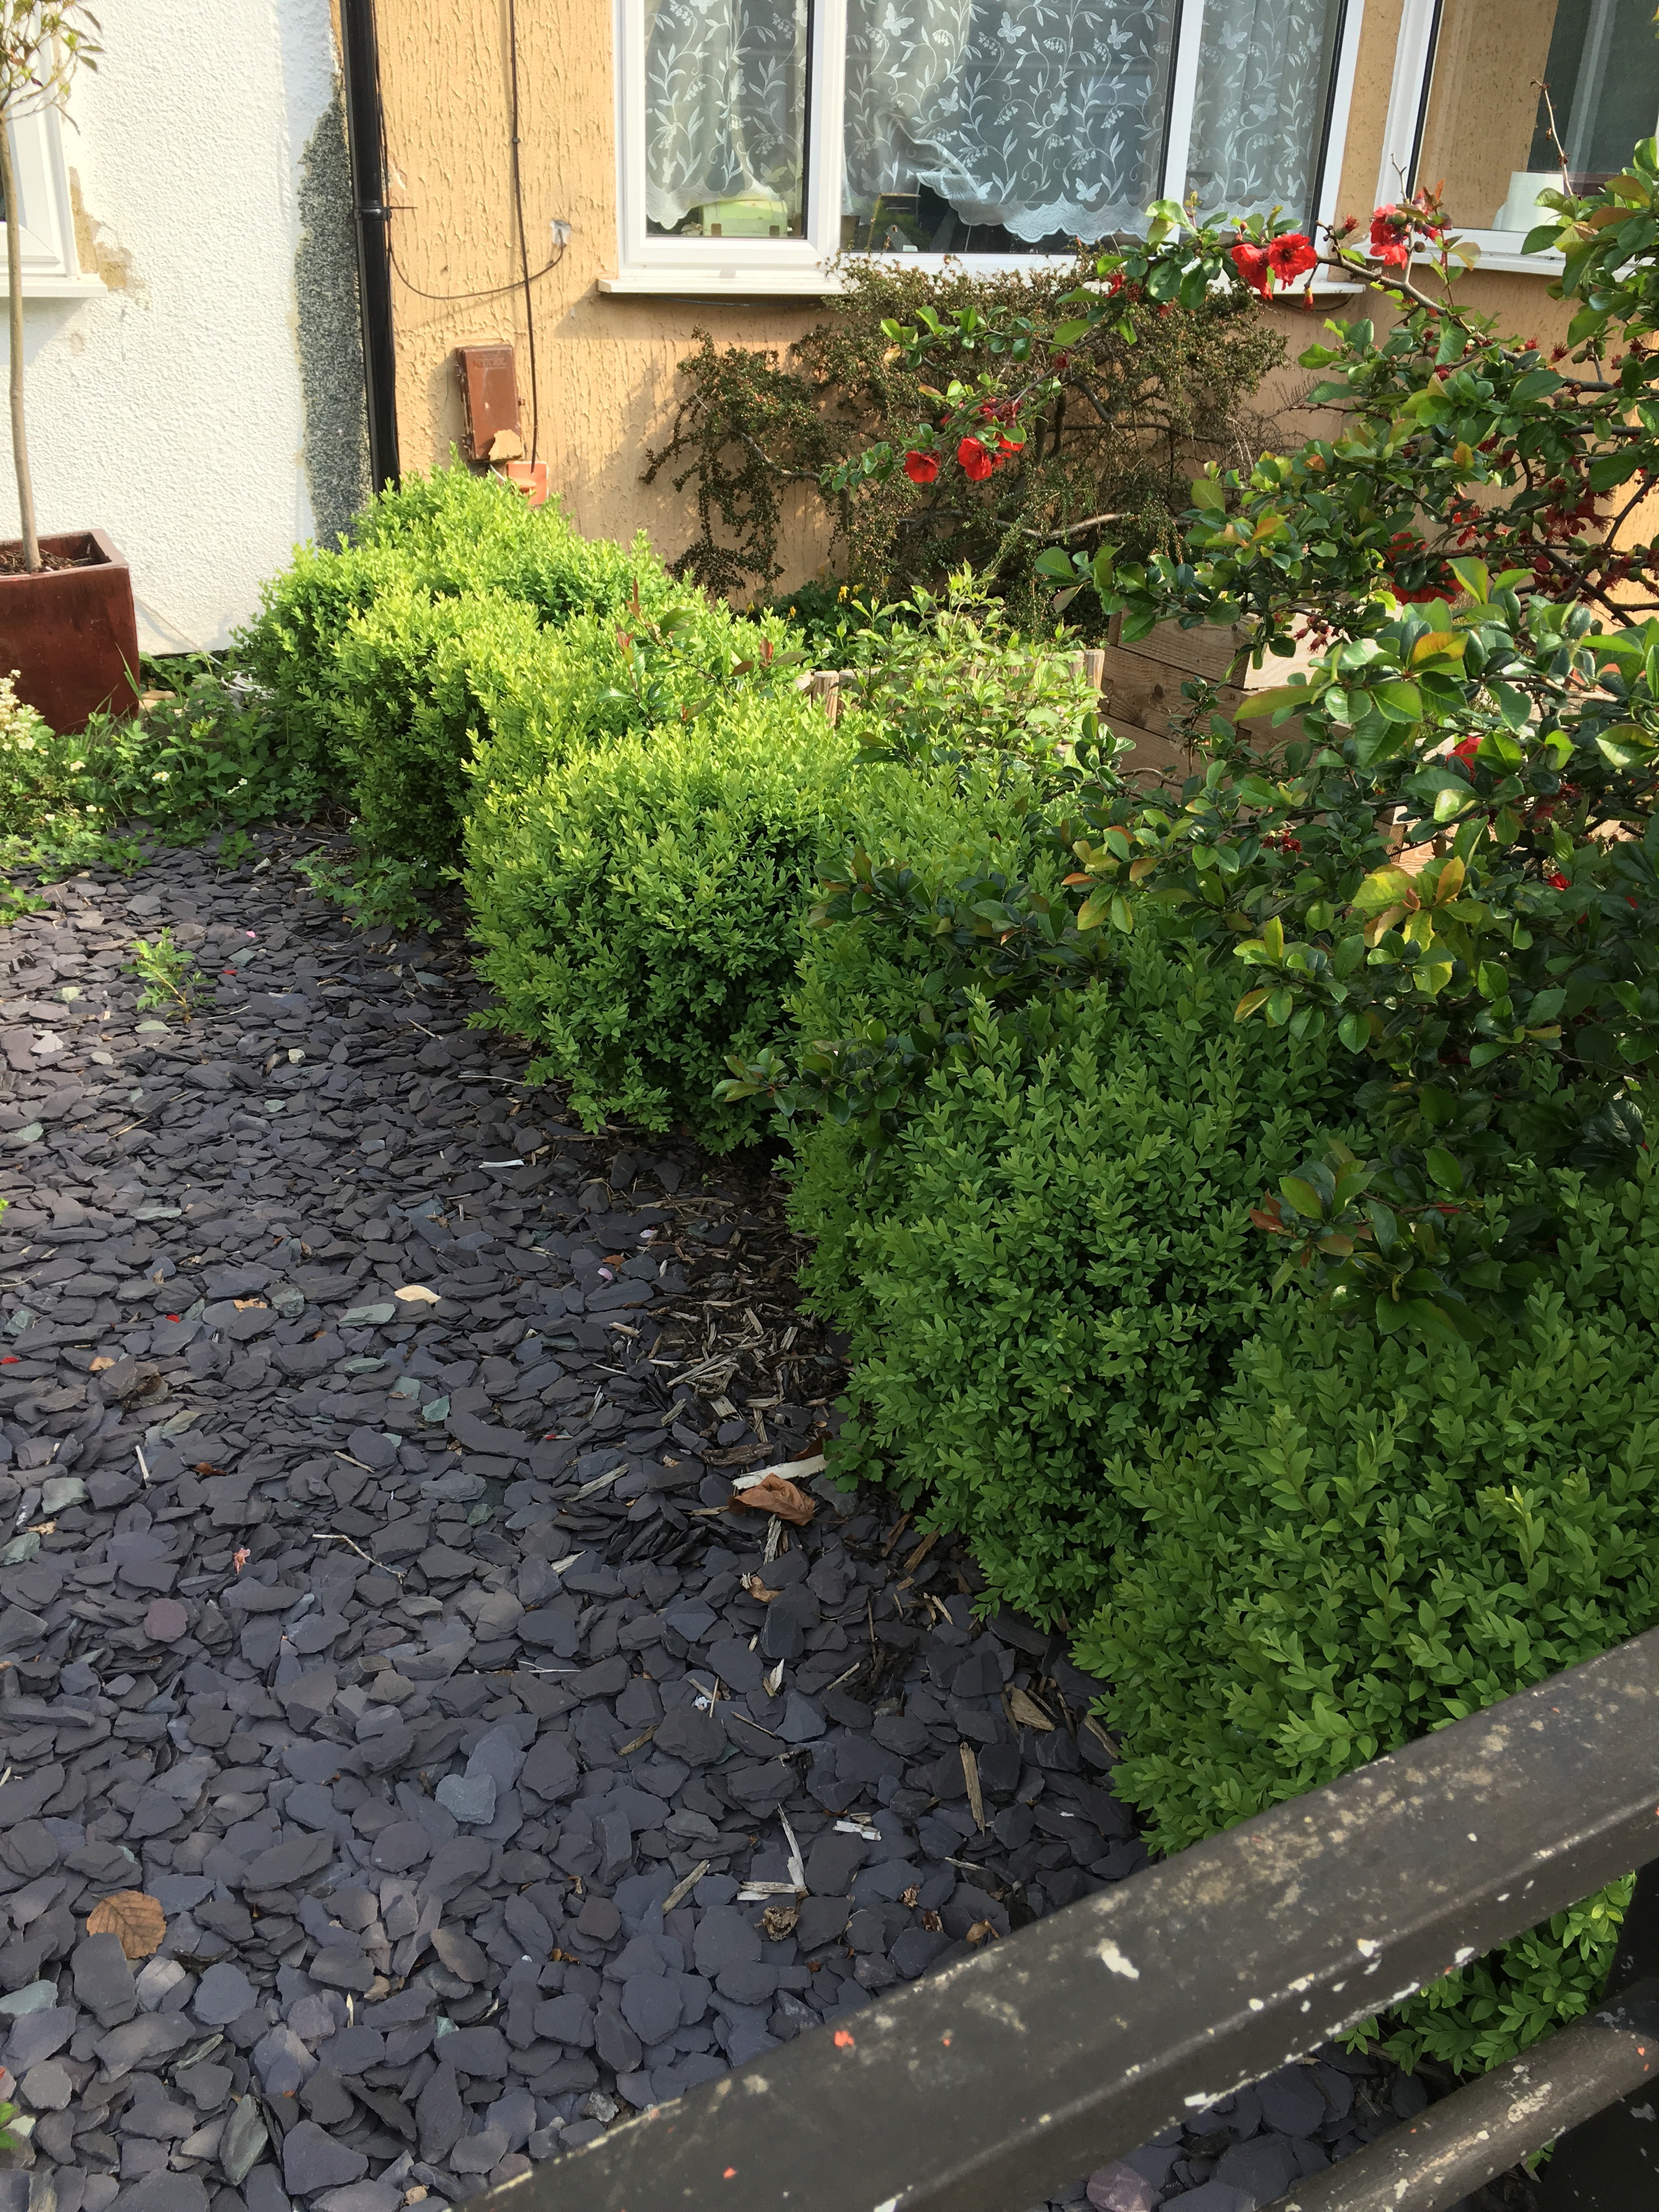
2016 update – 3 year old hedge. In need of a haircut!

2017 update


I didn’t realise how much it had grown until I looked at last years photo. This is after pruning it. Starting to look a lot more like a hedge (no gaps between the plants now), and I’m continuing to give it an interesting shape by cloud pruning. Much more fun than a boring regular shaped hedge!

July 2020 Update – 7 years old

Thought it was time for an update! The hedge took quite a battering because I had scaffolding up for about 5 months over the winter, and some of the poles were pushing right into the hedge.

I gave it quite a bit of a haircut today. Still keen on the cloud pruning, but need to get back out there and finesse it a bit. When the blister on my hand disappears!

Crazy Jam Lady

Standard

I always look forward to July as to me it’s the beginning of the jam making season (rock ‘n’ roll!). My friends and family are possibly more excited than I am as I usually turn up proudly clutching jars of my carefully made produce. Or at least they pretend to be excited, maybe they are just polite!

So the wonderful Tulleys Farm near me opened its pick your own fields last weekend, and I was down there as quick as I could to get the first crop of strawberries. I like to think of myself as an efficient strawberry picker, and half an hour later I left clasping my precious cargo.

20120701-171053.jpg
I know I’m in danger of coming across as a crazy lady – but here are my top tips for picking strawberries:

1. Walk to the furthest part of the field (people are lazy and will typically avoid walking, so you get the least picked over section if you bother to walk a bit).

2. Work your way up a single row (don’t jump about between rows just because
you spot a beauty!), and use both hands to pull the leaves apart so that you can find the hidden gems.

3. Pick both ripe and slightly under-ripe fruit as there is more pectin in under-ripe fruit.

Once you’ve got your beauties home, get to work quickly or pop them in the fridge as they can quickly spoil.

I like my jam chunky, so I don’t chop or mash my strawberries. I just chop off the stalks and halve any really large ones. Then a quick wash and it’s weigh in time.

20120701-172359.jpg
Commercially prepared jams are often much less than 50% fruit, but I like to make mine 60% fruit and 40% sugar. This batch was about 2.6kg fruit, 1.8kg sugar. I never add pectin as I find I don’t need it, though I probably boil my jam for longer than people who add pectin to ensure it sets (particularly strawberry which is low in pectin).

You don’t need a jam pan, any large heavy bottomed pan will do, but I love the size of my pan – it can take about 3kg of fruit and let’s you get a good rolling boil without spilling over. Another handy piece of equipment is a jam funnel. It’s shallower and wider than a regular funnel, and let’s you fill your jars quickly and relatively drip free.

Before you begin pop a couple of saucers in the freezer (trust me on this one), and put your jars, lids and a ladle in the dishwasher (or give them a really hot wash by hand). Also put the oven on a low heat – when your jars come out of the dishwasher put them on a baking tray and put them in the oven to dry and stay sterile.

Then chuck your strawberries in the pan and add the sugar. Some recipes say to warm the sugar but I never bother.

20120701-173252.jpg
Turn the heat under the pan on low and give your strawberries and sugar a good stir so they are well mixed.

20120701-173540.jpg
Keep the heat fairly low until the sugar is dissolved, then you can whack it up and get it boiling. I like to give it a helping hand and squish the strawberries against the side with my wooden spoon. But that’s probably more for my amusement than anything else. This is what it looks like early on when it’s boiling.

20120701-174327.jpg

Some folk like to use a thermometer, and apparently the setting temperature is 105 degrees centigrade. I prefer the old fashioned method of cold plates. Largely because I get to taste the jam as it cooks.

When it starts to look jammy in texture – like this

20120701-174539.jpg
take one of your plates from the freezer and put a teaspoonful of jam on it. Pop it in the fridge to cool and then slide your finger in it like this:

20120701-180643.jpg
You are wanting it to crinkle away from you and leave a clear space where your finger was. In this photo it’s too soon, so keep on boiling until you get this kind of result:

20120701-180843.jpg
It’s not rocket science – it will look like jam not purée!
Then it’s time to skim off the scum (nice!) and get ready to fill your jars. Some people recommend adding a knob of butter to get rid of the scum.

Pull your jars and lids out of the oven and put them. Lose to the jam pan. The closer you get everything, the less mess you’ll make.

Using a ladle, spoon the jam into the jars, preferably using a jam funnel. Fill the jars to the top. The less air the less likely it is to go mouldy. Or so I like to tell myself. Immediately place the lids on, you can tighten them as everything cools.

Clean the jars up with a hot cloth when they are still warm and put nice labels in them. I found these Kilner labels in Cargo which does stock quite a few jam making things, including Kilner jam pans and jars. My personal favourite jars are from Lakeland and not just because I was brought up down the road from their Head Office. They come in 1lb and 1/2lb sizes in boxes of 12.

I experimented this time and added some Marc de Champagne (the stuff champagne truffles are made with) to the last two jars (added it to the pan before filling the last two jars) to make some tipsy jam. Looking forward to trying it out.

20120701-192110.jpg

Check out the finished product.

20120701-192219.jpg

And the real final product…

20120701-202733.jpg
It’s delicious!

Care to share your top jamming tips?

Luscious Lavender

Standard

So in lieu of being able to actually do any gardening or DIY (until we move in) and a bit of RSI preventing any knitting or crochet, I’ve been daydreaming and planning.

I’ve got a dream of a gorgeous smelling cottage style garden with a cool summerhouse/playroom made out of the converted shed.

As the garden is currently paved over it’s definitely a blank canvas.

A bit of web surfing has turned up some lovely pictures to inspire me which I thought I would share with you below. Links to the relevant sites are also given.

I’m a huge fan of lavender and love the look of this lavender patch, in particular the use of different types and colours of lavender:

>20120614-192721.jpg</a

Lavender

I am really looking forward to planting my own patch.

I also can’t wait to visit Mayfield Lavender Farm which is nearby. The lavender is almost out and I think I might take my camera and take a few snaps of the munchkin. They even have an annual photo competition. Check out last year’s winner.

20120614-204552.jpg

I have already bought a couple of plants from there, including one with beautiful pink flowers which is thriving on my balcony, despite the attention of the local pigeons.

I also like the look of this lovely wheelbarrow:

20120614-204658.jpg

Lavender wheelbarrow

What I have been surprised to find is the different types of lavender have very different scents” some more medicinal smelling than others. I also guess they will thrive in different conditions, but I’m not really sure. Anyone know?